5.28.2014

Decorating With Nautical Charts


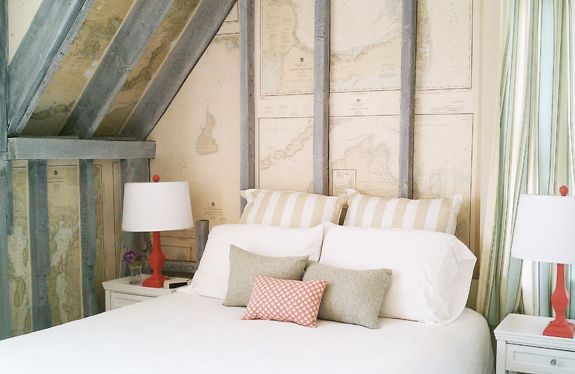
Summer is just around the corner and I'm looking forward to spending time with our girls while school is out. The highlight of our summer is to visit our old family home in Massachusetts that has been in the family for 5 generations. One of the rooms is called the 'Map Room', which is funny because its decorated with nautical charts (not maps). The original structure was a carriage house built in the late 1800's, my grandparents inherited it and, with a lot of hard work, turned it into their home. (Jenny, from Little Green Notebook featured the room a few years ago.)

Everyone in the family pitches in to make this family home a treasure and a place where we all want to be. In this room, my uncle pickled the beams and hung nautical charts of coastal Massachusetts on the wall. I love the use of nautical charts and this room has inspired me to use them in my own home. My mom, sisters and I have all worked together to put up new curtains, bedding and paint (a few years ago). My sister painted the lamp stands coral and I love the pop of color in such a serene space.


You can get nautical charts for a good price through NOAA, who make the charts. I'm sure I'll be sharing some other rooms in the house this summer. Have you ever used maps or nautical charts to decorate a room? I would love to hear your ideas.

5.23.2014

Red, White and Blue

Red, White and Blue

Red, White and Blue 


pillows   /   mirror /   lanterns   /   basket   /   chair   /   sea print   /  
 lantern   /   anchor pillow  /    ikea chair


Here's some red, white and blue inspiration for you! Memorial day and Fourth of July are great times to bring in some pops of red and blues. The bistro chair (in the middle) you can find one similar at Target now for a great deal (on my wish list) 
I hope you all have a lovely Memorial weekend!

5.20.2014

Tutorial: DIY Color Block Hutch

Today, I'm sharing my tutorial on how we made our color block hutch for the CWTS contest. I've been meaning to share this on the blog along with my bar cart and aluminum sunburst mirror (which is coming up later this week).
We've been looking for a tall hutch for our dining room, but didn't want to pay the huge price tags which normally come with similar furniture. The alternative is to make it yourself! I found an old buffet table at a local thrift store. It was out dated but sturdy. This was the perfect candidate for the base of the hutch we've been looking for. The  CWTS challenge was just the motivation I needed to make this happen! 


Here's how we made it...

5.16.2014

Add Bedding Details

Bedding can make a big difference in a bedroom. Most of the bedding I had been looking at for my daughter's bedroom makeover for the ORC was expensive and I just couldn't go there with my budget. Bedding can be expensive, but there are simple ways to add your own flare to inexpensive bedding or a sheet to create a chic look at a low cost.
 By adding coral grosgrain ribbon to a white Ikea duvet cover, I was able to create a timeless look. Here was my inspiration:
Bordeaux Bedding (Pink)
                                                          Land of Nod ($198)
                   
                                                             Crane & Canopy ($179)
First, I washed and ironed the bedding. I rolled out ribbon on the bed to see what shape I wanted to do. Hotel bedding is the inspiration here. I decided to go with not just your normal rectangle shape. At first I was thinking about mint, but then I went to JoAnn's and bought some coral ribbon.
                                                           
Once it was laid out, I used some fabric glue to help it stay in place and then I did a quick sew around to attach the ribbon to the bedding. I did the same shape on the pillowcases.

My cost $37

Why haven't I done this to more of our bedding? It was a simple project that added a lot of class. Have you ever done a ribbon trim before? I also realized that I didn't give out all my sources for her room so here it is:

Sources for room:
Ikea bedding
pillow (fabric)
fabric for headboard
curtains Ikea
paint: SW Naval, BM White Dove, (hutch) SW Charisma
bulletin board fabric
Vintage (or thrifted): desk and chair, hutch, chair, bench seat, lamp (spray painted), side table
art: Sisters watercolor, a lot of homemade art


Linking this post to: Home Stories A to Z
                               DIY by Design
                              
                               Best of the Nest

5.14.2014

California Dreaming

Last weekend (right before the ORC reveal) I was in San Diego area and had never been there before so I soaked in the sun and enjoyed some time with my man (sans children). All I have to say is, now I understand why so many people want to live in California! It's so pretty and beautiful weather almost all the year long (and no mosquitoes!). I'm sharing some pictures of the trip today. I took plenty of pictures of palm trees, probably because it's so exotic to me, being from Maryland.  
We went over to Coronado Island and visited the historic 1888 Hotel del Coronado- which is stunning.
The dark wood interior of the lobby area of the hotel has original paneling, lighting and even the gold metal on the elevator shafts.
I found loads of inspiration in their gardens there.
Balboa Park is another beautiful area we went to where there are museums, a zoo, gardens, and theaters. I really enjoyed the Spanish architecture of many of the buildings.
Another place we went to is La Jolla, where they have gorgeous beaches, hiking and caves. We went hiking and toured a cave. There are seals and pelicans a plenty here.
My sweetheart and I also celebrated our 14th wedding anniversary! Love this guy!
                                    This is a view of someone's back yard- how cool is that?
I had a great time and hope we can go back as a family. There is a lot to do and see in this area. Thanks for letting me share this trip. I would love to hear if you've ever been to San Diego or live there. What's your favorite place?

5.12.2014

DIY A Tall Headboard

I hope you all had a great Mother's day weekend. I felt spoiled with treats, flowers and my daughters gave me a spa evening by giving me a massage and polishing my toes. Being a mom is the best thing I have ever done!

Onto making a headboard! When working on our daughter's room makeover, I decided on a tall curvy look for the head board. Here's how we made it:
 1. Draw it out. The hubs used an Auto-Cad program to draw out our shape. However, you could simply draw out your shape and measure everything so it looks like the dimensions you want. Our shape is the dimensions for a full size bed.
 2. Cut it. We used a jig saw to cut the shape out of 1/2" OSB plywood (usually under $20).
3. Batting. Staple the headboard with batting. I used two layers of batting. 
 4. Cut out fabric and staple. I should mention that before I cut the fabric I ironed all the wrinkles out first so that when we went to staple it would already be smooth. We cut slits in the back to avoid creasing in the curved areas of the head board. We pulled the fabric tight when we stapled the fabric (using an upholstery staple gun) so we would get a smooth finish.
5. Mounting the headboard. We measured how high we wanted the head board to be and then used two  2x4's (which we had on hand) and screwed it to the backing after we had installed all the fabric and batting.
6. Nail head trim. I found a great product for nail head trim (JoAnn's). This roll of nail head can easily bend into the shape needed. We used a tape measure to ensure the same distance from the edge all the way around. We really had to nail the tacks down since there were the two layers of batting. Once that's on then we put it behind the bed and pushed the bed back to the wall to admire this tall new curvy headboard.
The headboard cost us $65 to make. I got the batting and nail head trim at 50% off, or used a coupon at JoAnn's. The fabric is from fabric.com and I only needed two yards. Plywood usually costs about $20.

A headboard makes a big difference in the feel of a room and it's great when you're reading in bed and can lean your head against something comfortable. Have you ever made a headboard before? I would love to hear how you did yours. Next up is showing you how I made the bedding- it's super easy!

5.10.2014

Happy Mother's Day

                     
                             Love is Patient Cake Topper
                                                                           Figs & Ginger
Thank you for all your comments on the makeover of our daughter's room the other day. Your comments make my day. I love how it turned out and she does too. I'll post on Monday how we made the headboard.

Today, I want to say thank you to all women in my life who are super inspiring and have brought such love into my life, especially my own dear mother. I love you! I hope you all have the best Mother's day weekend you can. Here are a few things that have caught my eye lately:

                   That cake topper (first picture) is so sweet and would be great for many occasions.
                
                   This video is about the toughest job in the world. At the end it makes me cry.

                    My love for paper will never die- here's another video- super cute.

A quick and easy (last minute) Mother's day gift to make are silhouette prints. I love how these prints really personalize a home (or you could make it a card). I made one for another one of our daughter's rooms.

                       Succulent plant gift idea for Teacher Appreciation and Mother's Day with free printable.  Love this!
               Here's another simple and beautiful gift for mother's day or teacher gift with a printable tag.

Women have tough, beautiful and significant roles to play in the world. All women, regardless if they are a mother or not can make a huge difference in other's lives. Happy Mother's Day!
                           

5.08.2014

Week 6: Tween Bedroom Makeover Reveal


Times up! Pencils down. Today is reveal day for our daughter's bedroom makeover. I am so excited to show you this refreshing space. Do you remember what it looked like before?
It's amazing what paint, fabric and some art work will do for a room. 
 I gave this adorable yard sale hutch a splash of coral paint and kept the inside the same SW Sea Salt paint I had on it. The plates are from a barn sale.
 The hubs and I made the headboard and I sewed the floral pillow and added a coral trim ribbon to IKEA bedding.
 I'm so glad our girl now has a bulletin board. I used an old Salvation Army picture and glued down some cork and then covered it with fabric.

                                                   
Yesterday, over twenty designers revealed their rooms and today you can see all the linking participants in the ORC here. Get ready to be inspired by all these spaces. Everyone did such an incredible job! Hope you like the room. I will show you how we made the headboard and how I made the bedding soon (it's not too hard and so economical). Thanks for stopping by here.