

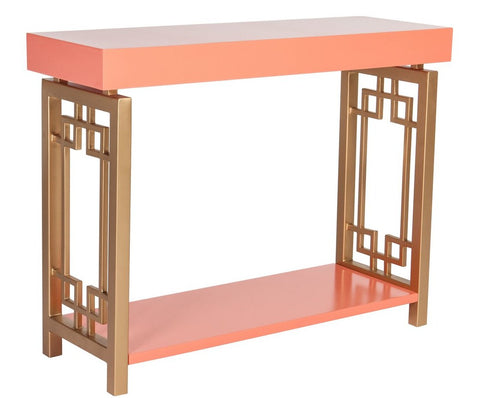
When I entered the CWTS contest I had a great idea for a classy knock-off project. I found on Society Social's site the Melrose Console Table which is tres tres chic. However, for $800 its not so chic for my budget. What got me about this table is the color and the fretwork. Oh the fretwork! With some creativity we made this table for under $100.
Learn more about how we made this table:
Material List:
1" x 4" x 10' pine (for the legs and fretwork) - 6 boards
3/4" birch plywood (for shelves) - leftovers from our Library Project
2" x 6" x 8' framing lumber (for top shelf frame) - 1 board
1/4" x 6" x 4' poplar (for the top shelf "apron") - 3 boards
Wood glue
Screws
brads (tiny nails)
wood filler
Paint: SW Ardent Coral and Rustoleum Spray paint Gold

The plan! My husband drew this out on the computer before we built it to see if we liked the modified scale of the table and to help us figure out what supplies we needed.

We ripped each of the 1" x 4" pine boards at 2.5" (for the legs and shelf supports) which gave us 1" left over (for the fretwork).

We started by making the fretwork box frames out of the 1" strips of wood. For our table, the box measures 15" x 9" (outside dimension). We then cut all of the small pieces that fit inside, each measuring 2" (inside dimension of the little box). We used a brad nailer and wood glue to bring it all together.

You'll notice the pieces that stick out aren't on yet. We learned that you need to install these last, as you are putting them into the table end frames. More on that later. Nice selfie!


Let it marinate with wood glue overnight with some clamps holding it tight and you'll find this the next day:

The completed wood sandwich! These babies will be the legs and shelf supports. We ran these through the table saw to clean up the edges.

Here are the legs and shelf supports ready for action. The 4 tall boards are the legs, the 2 medium boards are the top shelf supports, and the two smaller boards are the bottom shelf supports. We then used glue and screws to make the table end frames as shown in the plan above. Don't forget to pre-drill and countersink the screw holes.

We used a router to cut a 3/4" wide "dado" (1/4" deep) along the center of the lower shelf supports. You can see how the lower shelf fits right in. If you don't have a router, that's o.k. too; you can just nail a piece of wood to the lower shelf support and rest the shelf on that.

The shelf is made of 3/4" birch plywood. The bottom birch shelf measures 32" long (this includes the two 1/4" tongues which fit into the dados in the lower shelf supports) by 16.5" wide. We then nailed a 1/4" strip of pine (left over from the 1" x 4" material) to the two sides to hide the end grain of the plywood. We then installed the fretwork into the end frames. We installed the 2" straight pieces (the ones between the fretwork frame and the table end frame) last so the fretwork would fit just right.

We filled the screw and nail holes with wood filler and sanded it down. Here is the completed table base.

This is a stylish glam-shot of me all covered in sawdust. High class all the way! Don't forget those safety glasses and ear protection while woodworking and then you can look cool like that.

For the table top, we made a rectangle frame out of standard 2" x 6" framing lumber. We also drilled pocket holes with a Kreg Jig which we used to attach the frame to the 3/4" birch plywood table top.

We then glued and nailed the 1/4" poplar hobby boards all around the table top and frame. This hides the end grain of the plywood as well as the frame.

Then we filled in the nail holes with filler and sanded it down.

Now to start painting. First, I spray primed all the wood with an oil based paint. I love zinzzer oil primer because it adheres well to surfaces and then you can paint on it within an hour or so. I used Shermin Williams Ardent Coral in an oil base, gloss finish for the table top and the lower shelf. I used Rustoleum's Gold spray paint for the table ends.


You'll also notice the table top is raised off of the table end frames. We did this by gluing a 2.5" square of the 1" pine to the top of the end frames. We attached the table top to the end frames by drilling up through the end frames and 4 raisers and then screwing up and into the table frame.

This was a fun project and we learned a lot doing it. If you are interested in building this table, e-mail me and I can send you the plans we made with all of the dimensions on it.


.jpg)

You two make it look so easy! I love the inspiration and your knock-off was spot-on. Thanks for the tutorial and I can't wait for the rest of them!
ReplyDeleteWe worked hard to make this table in a short amount of time and had so much fun. Thanks for your kind comment!
DeleteThis is so awesome! I'm super impressed with all of your handiwork!
ReplyDeleteThanks Grace! My husband and I had a great time putting this table together and we love it in our home. Thanks for stopping over here.
DeleteI so admire people like you with this kind of skill and patience! I still cannot believe this table didn't take you all the way to the end!
ReplyDeleteBeth, you are so kind. My husband and I are a good team when it comes to DIY things. We had a great time making this table for the contest. My other tutorials will be up soon too.
DeleteThis is unbelievable! What a great project...Gold and corral are my favorite color combination!
ReplyDeleteConsole tables are a perfect blend of style and function. At Vibecrafts, you can explore beautifully designed console tables that add elegance to any space while keeping it organized.
ReplyDeleteGreat article! A console table really does add both beauty and function to any home. I’ve been exploring different styles recently and came across Vibecrafts. Their collection of console tables has stylish wooden designs and modern options with storage that perfectly fit today’s interiors.
ReplyDeleteThis console table from Vibecrafts adds charm and functionality together. Modern look, sturdy build, and perfect for organizing essentials. It blends style with practicality, making every corner feel warm, classy, and thoughtfully designed for today’s homes.
ReplyDelete