Showing posts with label DIY. Show all posts

6.03.2015

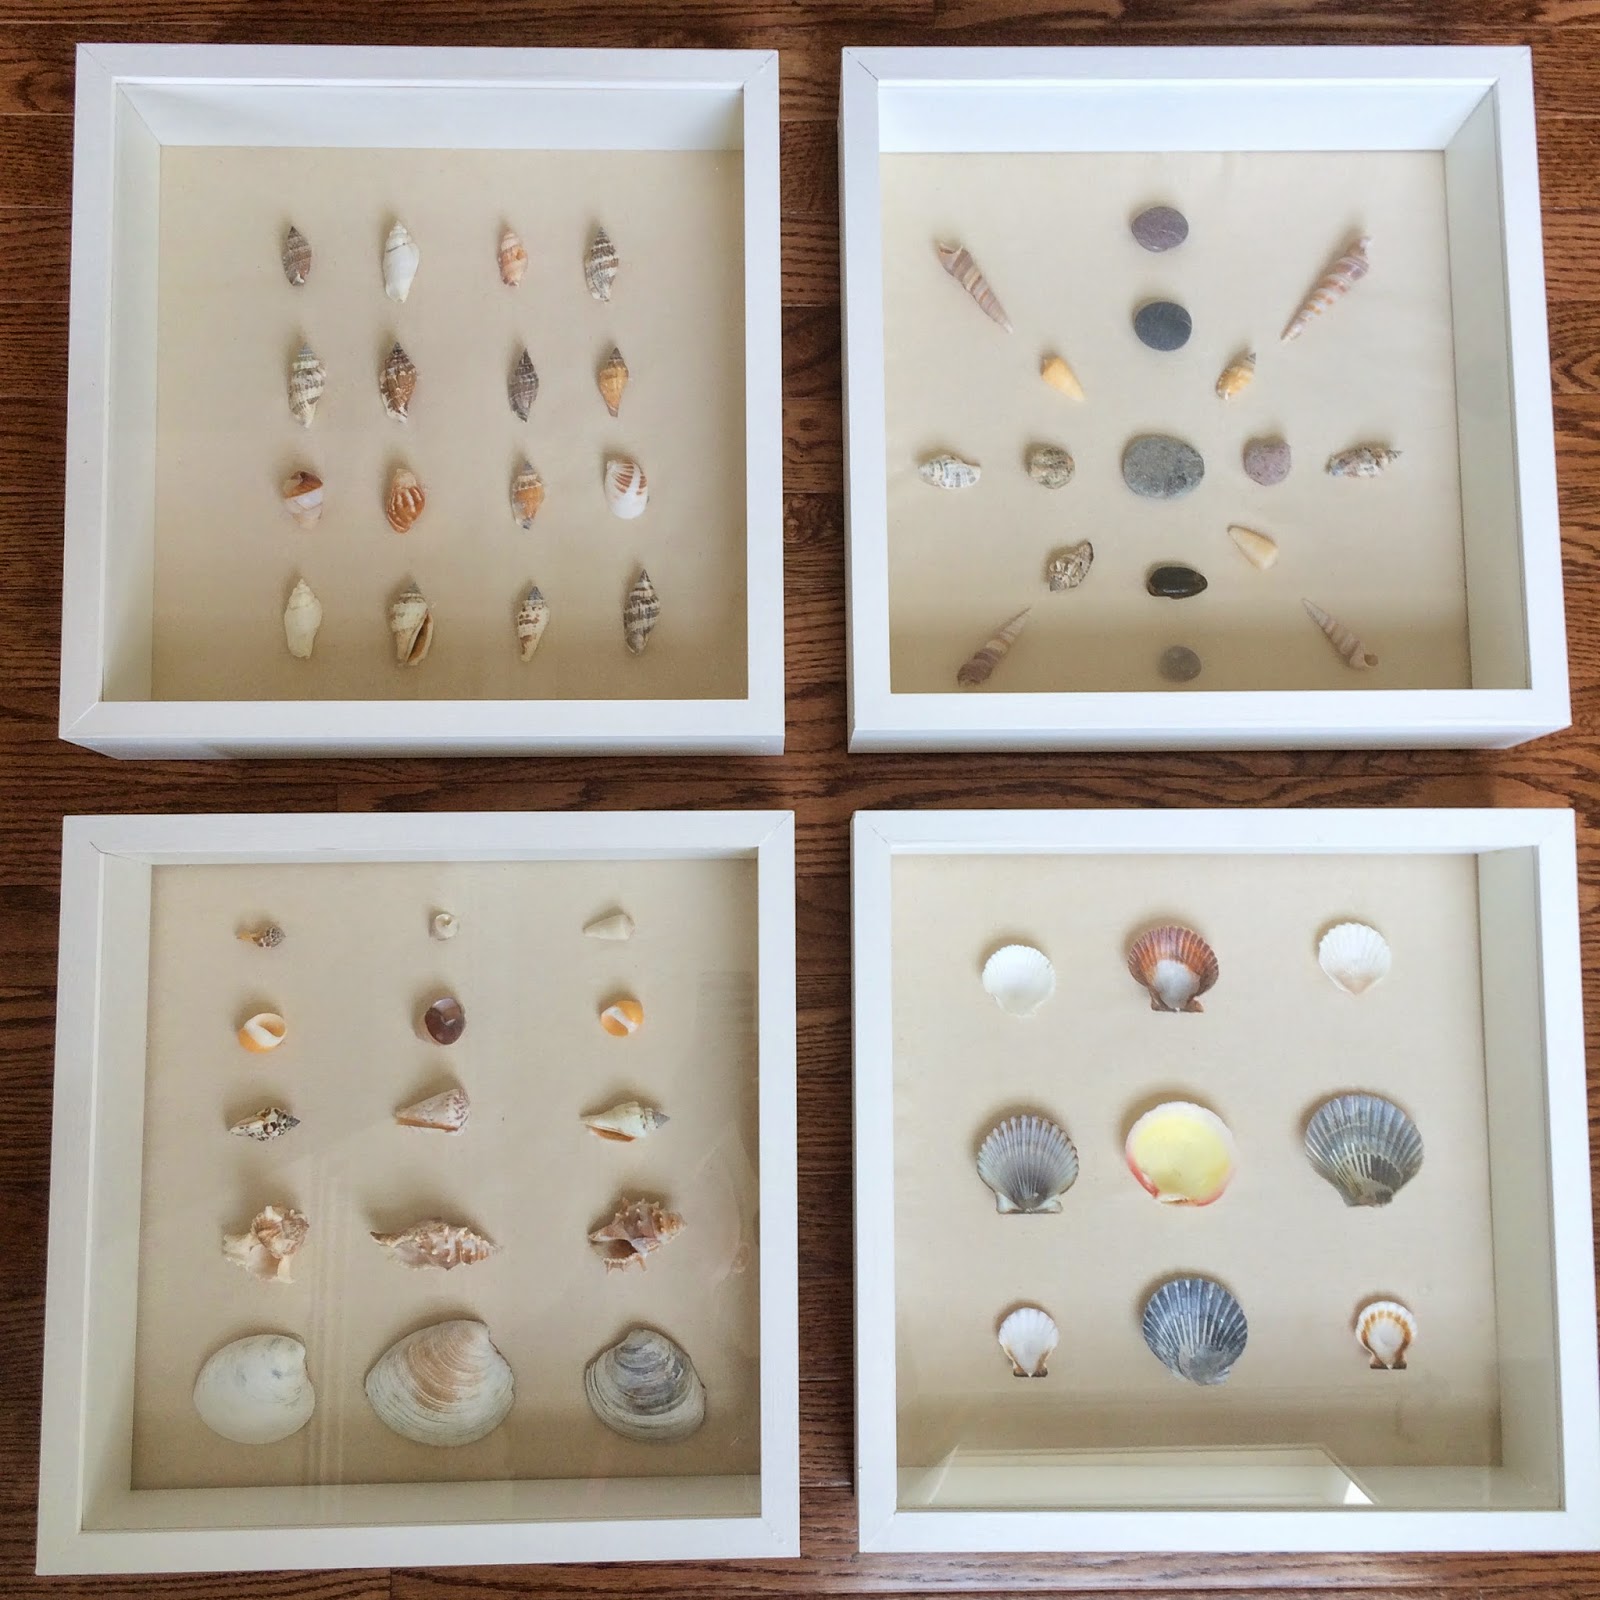
DIY Shadow Box and Shell Art

Frames and art can be expensive! When the hubs and I did a makeover of our master bedroom we needed some art work on the walls, and we were working with a limited budget. Every summer we collect shells and rocks when we go to the beach and we liked the idea of displaying them in a gallery like fashion above our dresser. Here's how we made these deep, sturdy and large shadow boxes.

What you'll need for each one:
- Glass: 14.5" x 14.5"
- 1x4: 6' (these are actually 3.5" wide, the same width as the fame)
- 1/8" Plywood backing: 14" x 14"
- cork pads
- picture hanging hardware
- small trim screws (1")

Process:
We've never made anything with glass before and were a little intimidated at first. It turns out, most Lowes carry glass and will cut it to any dimensions you choose for a reasonable cost. We had four pieces of glass cut at 14.5" x x14.5".
Now to start cutting the wood: First, cut the dado and the rabbet in the full-length boards. The dados are for the glass and the rabbets will be for the backing. We used a table saw to cut the dados with the blade 1/4" high and offset from the side of the board by 1/4". The saw blade is slightly wider than the glass which was perfect. Once cut, the glass fit perfectly into the dado. We used a router for the rabbet using a 3/8" rabbet router but.
Next, cut the sides using a miter saw. We used a 45 degree mitered joints for these. Each side is 15" long.
Then, you'll cut the backing 14" x 14". That's it!
Now time to assemble!


Only glue and nail the bottom and two sides at this point (otherwise, you wouldn't be able to put the glass in.). After the glue dries, slide the glass in place to make sure it fits. 


Next, paint. It is easier to paint these babies before putting the glass in. We used primer and Benjamin Moore's China White. Tip: don't get paint in the dado (the groove for the glass). We learned this by experience. The glass fit snug before we painted and some of the paint got in. the groove making it too tight for the glass. To fix this issue, we just ran the boards though the table saw again to clean out the dado. 

Once the paint dried, we put the glass in. We then glued and nailed the top piece of the frame in place. The frame is now complete!
You can really put anything in these shadow boxes, but if you're going to go for a look similar to ours you will need:
-Linen type of fabric
-Shells and rocks
-hot glue gun

Arrange them anyway you like. I really like the star like design, and wish I made more of those. Once your art work or shells are glued down you can put the backing in place in the rabbets and screwed in place. We pre-drilled our countersunk holes in the backing for where the screws were going to go to avoid any splitting and so the screw heads would sit flush with the backing. There you have it. Affordable art work and a timeless look.

4.30.2015

ORC Week 5: Headboard and Progress Update

Here we are in the 5th week of our master bedroom makeover for the One Room Challenge..gulp! I can be a  bit of a procrastinator so it helps me to have these deadlines. However, I will probably be cutting it close since there is still lots to do. You can catch up on the progress of the previous weeks here:
                       1                         2                               3                                4                                                                
However, this has been a productive week:
The hubs made these beautiful deep shadow boxes and I used a lot of hot glue to make some shell art. This will most likely go above our dresser. I'll post a tutorial on these babies soon.
I showed a preview on Intstagram of our DIY headboard! The height of it really makes a statement and I'm loving it! Now, I need to figure out if I want anything above our bed. I did have a black mirror, but I think it might be too large for the space. Also, this week, the curtains got lengthened by my friend Janet who offered to sew them for me. Talk about nice! She can sew well and faster than me.  I think they turned out pretty with the pleats. I have some pillows to sew and so you're seeing an image with me playing with fabrics. The bench is 95% done. I need to finish cutting off the excess fabric. I decided to paint the legs black and put a peacock green blue fabric on it to give it a rich color.

Big Craigslist deal this week. We bought two armories for a steal. The front one we'll keep for the bedroom and the second one we'll sell. We are planning to paint them this weekend. What do you think: white or gray paint? I plan on using gold pulls. Hmmm... I better make my decision today.  We have a sprayer, so that will help speed up the process (cross your fingers).

Also, I will be picking up this desk today. Next week, Steve and I celebrate our 15 year anniversary. I'm really glad we decided to do this challenge so we can have a beautiful space that we can enjoy. I love that guy!

Here's what still needs to happen this week:
-Sew pillows
-Finish dresser
-paint armoire
-put desk together
-hang photos and artwork
-finish bench
-Style and shoot

No big deal right? Now, I'm off to see what some of the other ORC challengers are up to. Come back here next Thursday for the reveal.

4.23.2015

One Room Challenge, Week 4 Art and DIY's

Thanks for stopping by today to see the progress of our master bedroom. You guys, this past week flew! There is still lots to accomplish in the room and I'm glad we have a deadline of six weeks since it pushes me to get it done. Cue the panic attack (Just kidding)! This weekend we'll have some time between kid's sport activities to finish most of the DIY projects. Fingers crossed.
You would be so proud of me, I finally ordered some photos of our family and places we love. Why does it take me so long? I like the idea of black and white photos to keep it simple for our room. Here are some art inspirations for our room.
Mostly there are cute family faces in black and white, but I also printed off some pictures I took of Martha's Vineyard where we like to go every summer. This is one of them:
I'm also working on some shell art in the shadow boxes that my hubby made. My collection of shells is not this extensive but here is an inspiration image:
I'm also looking at a floor length mirror for one of the walls. I looked at HomeGoods the other day and they have quite a few that might look good. I better make a decision soon. I like this one from Kirkland's too.

The headboard is almost done. We installed DIY French cleats for the backing and I used a white heavyweight curtain as the fabric. We still need to put on the upholstery tacks.
Lots of our DIYs are started or almost done, so I hope to have more completed pictures for you next week. You can see what I've done in week 1,2, and 3. Stop by and check out my friend's progress in the ORC and the 20 designers who are all working hard.

3.10.2015

Girl's Room: Art On The Walls And a Give Away!


First of all, thank you for all of your kind comments on the upholstered sofa. I feel like a proud mama of a blue
velvet couch! Ha! Today, I wanted to talk about art in children's rooms, namely my twin's room. Our girls
didn't have much on their walls and they were excited when we put up a gallery wall of pretty
art work for them. Squeals of delight!
Most pictures in their room are DIY,  thrift store art and a gorgeous print from Heatherlee Chan. You
don't need to spend a lot of money to get the look you want, but you do have to be willing to make
something. I hope you'll be inspired to make some art for your home. First, let me give you a tour of the
galleries:
On the dresser, my husband and I made this frame last year and I love the picture of our girls in there.
Above the large frame is this darling print, Sisters Art, I bought from Heatherlee Chan. Her art is
charming, whimsical and feminine- perfect for our little girls. They actually picked the print out, but I had a
hard time choosing just one. All her art is darling! I framed it in an Ikea frame and used a gold sharpie
to make some polka dots around the mat.
The flowers painting in the corner is one of my first attempts at oils in a long time. I had a great time
painting again and thought it would look good with the paint in their room (which is Benjamin Moore's
Love and Happiness). The ampersand and the silhouettes are also painted/cut by me. For the
ampersand, I sketched out the shape on fabric and cut it out. The key for this was to have thin material.
The 'Be Brave' banner was also cut pieces of fabric and adhered using Fabri-tac. The Degas' Dancers
print is from a thrift store and the calendar is from Rifle.

For my $5 thrift store chair I spray painted it white and used a gold sharpie to make the crest and vines. I
loved the chair when I saw it because I could see some kind of art or monogram going in the middle of it.
On the other side of the room, I had my two girls paint some watercolor art and I put them behind a
white mat. I can easily change out their art here if I want. They had a fun time making art for their room.
The map is from artist Judy Kaufmann. Love her work too!
After Christmas I spent a long time weeding through clothes and toys that were not used anymore. It felt
good to organize and simplify their toys. Putting their toys in plastic, labeled bins has been a HUGE
improvement from the catch-all baskets I had in here before. The girls now put their toys away and in
the right spot! Hallelujah!
These lamp bases are from Ikea and I used some Rub N'buff on them to give them a gold/brassy look.
I'll show you the rest of the room soon. We recently put their beds into bunk beds which makes
this room feel larger. The girls have a great area to play in now.
Heatherlee is kind enough to give one of you lucky ducks an art print. You get to pick which one 
you like/love. Her art will get you excited for Spring with so many floral prints and if you have a
 little child in your life it makes charming art for kid's rooms. 
Blog Give Away

To enter the Giveaway: First go to Heatherlee's Etsy store, Laddy Poppins to find your favorite print. Then, comment below and tell me what would be your favorite Lady Poppins print. One comment per entry. One winner will be chosen at random and will receive an art print. Make sure your comment is not a "non-reply" or else I won't be able to get in touch with you. 

For additional entries:
2. Follow me on Google Connect or Bloglovin
3. Follow me on Instagram
4. Like me and follow me on Facebook.
5. Subscribe to Heatherlee's mailing list
6. Like Heatherlee on Facebook.

The Give Away will close Friday, March 13th.

********** The Give Away is now closed. *****************

Linking this to: The Best of the Nest Link Party

2.26.2015

The Courage To Reupholster A Sofa and (a Sort of) How To

I'm finally writing about this pretty camel back sofa I got last year, which went through a makeover. Now, I know this sofa is not perfect. I fully recognize areas that might be too lumpy or not pulled tight enough. Therefore, I must apologize to all of you perfectionists out there, but I'm just thrilled it's done and not looking half done. I am by no means a professional upholster. I upholstered a small chair a few years ago. I really wanted to bring this to an upholsterer but that darn budget forces me to take measures into my own hands, literally. I am so glad I did it. I had several friends come over and help me take this couch apart (I bribed them with lunch) and a good friend that helped me sew the cushion. 

One friend who came over to help me said encouragingly, "Tracy, you just have to look at this as your practice sofa. Who cares if it's not perfect? Try your best and don't worry about it." Oh, how wise! These were just the words I needed to hear to get over some of my fears of upholstering a whole sofa, which sounded daunting sometimes. Actually, it's good advice for anything we do, especially in design. There has to be some trial and error and we learn from our mistakes which help for the next project that we do. 

If you ever find yourself wanting to rescue that chair or sofa and you know you'll need to reupholster it, then know you can do it! You will need to have some determination, goals and band aids near by when you take that sucker apart. 

The sofa project took a long time because it got put on the back burner with other projects several times. I hope to be able to explain some tips and things that helped me upholster the sofa. Every sofa or chair is different and I'll explain the things that helped me with my particular sofa. 

Step 1: Find your vision and sturdy fabric
I had read how velvet is a wonderful durable upholstery fabric so I wanted to go with that type. Also, I knew I wanted to stick to something solid in color (as a beginner upholster). It would be difficult to match up stripes or a patterns. 

Finding navy blue velvet was not common. I ended up finding some on Ebay for $12/yard. 


upholstery chart
                                                          image source
This chart helped me know about how much fabric to expect. It's always a good idea to buy extra fabric than what it calls for so you can feel safe you have enough.

2. Research
I looked up some You Tube videos and found this one most helpful here. Also, Jenny from LGN has some incredible upholstery tutorials. There are also several books out there that are helpful like this one, which I got at the library. 

Step 3: Stripping the sofa
You need:
-flat head screwdriver
-pliers
-hammer
-a bowl (to collect staples) and band aids (it's easy to hurt your hands doing this part. You could wear work gloves.)
Save all your pieces of fabric and label them. You will use these pieces as your template for your new fabric.Also, save the welting/rope to reuse it for the welting. My little girls added some stuffed animal friends on the sofa to keep me company. 
Step 4: Stapling the sofa:
You'll need: 
-Staple gun
-Air compressor with upholstery staples in the gun. This way it went fast!! (optional)
-Scissors
-the new fabric (cut pieces)
-Curved needle (I needed this in one section)
- I used cardboard for the front arm
- Fabri-tac adhesive
-Nail head trim (optional)
Once all your fabric has come off then you're ready for the stapling to begin! And yes, this looks like a mess. The other major motivator to work on the sofa was so our puppy wouldn't eat the whole thing. Don't you love all the little stuffing on the floor?
The curved arm originally had welting around it. I decided to make a separate piece to cover this area. Here's a good shot of the air compressor we used too.
Once I stapled the arm as best as I could I traced the shape of the arm onto a cereal box or thin cardboard.
The cereal box got covered with velvet using  fabri-tac upholstery adhesive. This stuff is great because it doesn't show any marks of glue once its dried and it really sticks well (it's a permanent adhesive that says its washable too).

                      Once the fabric was covered then I used brass nail head trim to hammer into place.

Work with what you have. Towards the end of the project I was running out of fabric. It wasn't too difficult to sew two pieces together on the machine and then staple the whole thing to the back. Again, this is not a perfect job, but I figured mostly the sofa will be against a wall so we won't see the back sewn piece.
The front bottom part of the sofa was tricky because the seat cushion was tightly sewn covering the springs and I didn't want to take that apart (which would have been a ton more work). I ended up using a curved needle and hand sewing the velvet to that section and stapling the bottom section.
Curved needle sewing isn't as scary as I thought. If you have the right tools, things go a lot more smoothly.
The cushion was sewn by my friend who has a great sewing machine. I asked her help because there were some sections where we were sewing through four layers of velvet (because of the welting). My basic sewing machine would not be able to handle all that work. I'm not going to explain the cushion sewing since she did most of it.
Overall, I'm happy to have a piece of furniture in our library room now besides our piano. Someday, we will add side chairs and a small coffee table, but this room is baby steps to being done. It's good for the soul to try challenging, out of our norm projects and I'm glad I did.


BOTN I'm joining the party button 125 x 125
here
and linking this to:
Not Just A Housewife