Showing posts with label DIY art. Show all posts

6.03.2015

DIY Shadow Box and Shell Art

Frames and art can be expensive! When the hubs and I did a makeover of our master bedroom we needed some art work on the walls, and we were working with a limited budget. Every summer we collect shells and rocks when we go to the beach and we liked the idea of displaying them in a gallery like fashion above our dresser. Here's how we made these deep, sturdy and large shadow boxes.

What you'll need for each one:
- Glass: 14.5" x 14.5"
- 1x4: 6' (these are actually 3.5" wide, the same width as the fame)
- 1/8" Plywood backing: 14" x 14"
- cork pads
- picture hanging hardware
- small trim screws (1")

Process:
We've never made anything with glass before and were a little intimidated at first. It turns out, most Lowes carry glass and will cut it to any dimensions you choose for a reasonable cost. We had four pieces of glass cut at 14.5" x x14.5".
Now to start cutting the wood: First, cut the dado and the rabbet in the full-length boards. The dados are for the glass and the rabbets will be for the backing. We used a table saw to cut the dados with the blade 1/4" high and offset from the side of the board by 1/4". The saw blade is slightly wider than the glass which was perfect. Once cut, the glass fit perfectly into the dado. We used a router for the rabbet using a 3/8" rabbet router but.
Next, cut the sides using a miter saw. We used a 45 degree mitered joints for these. Each side is 15" long.
Then, you'll cut the backing 14" x 14". That's it!
Now time to assemble!


Only glue and nail the bottom and two sides at this point (otherwise, you wouldn't be able to put the glass in.). After the glue dries, slide the glass in place to make sure it fits. 


Next, paint. It is easier to paint these babies before putting the glass in. We used primer and Benjamin Moore's China White. Tip: don't get paint in the dado (the groove for the glass). We learned this by experience. The glass fit snug before we painted and some of the paint got in. the groove making it too tight for the glass. To fix this issue, we just ran the boards though the table saw again to clean out the dado. 

Once the paint dried, we put the glass in. We then glued and nailed the top piece of the frame in place. The frame is now complete!
You can really put anything in these shadow boxes, but if you're going to go for a look similar to ours you will need:
-Linen type of fabric
-Shells and rocks
-hot glue gun

Arrange them anyway you like. I really like the star like design, and wish I made more of those. Once your art work or shells are glued down you can put the backing in place in the rabbets and screwed in place. We pre-drilled our countersunk holes in the backing for where the screws were going to go to avoid any splitting and so the screw heads would sit flush with the backing. There you have it. Affordable art work and a timeless look.

3.10.2015

Girl's Room: Art On The Walls And a Give Away!


First of all, thank you for all of your kind comments on the upholstered sofa. I feel like a proud mama of a blue
velvet couch! Ha! Today, I wanted to talk about art in children's rooms, namely my twin's room. Our girls
didn't have much on their walls and they were excited when we put up a gallery wall of pretty
art work for them. Squeals of delight!
Most pictures in their room are DIY,  thrift store art and a gorgeous print from Heatherlee Chan. You
don't need to spend a lot of money to get the look you want, but you do have to be willing to make
something. I hope you'll be inspired to make some art for your home. First, let me give you a tour of the
galleries:
On the dresser, my husband and I made this frame last year and I love the picture of our girls in there.
Above the large frame is this darling print, Sisters Art, I bought from Heatherlee Chan. Her art is
charming, whimsical and feminine- perfect for our little girls. They actually picked the print out, but I had a
hard time choosing just one. All her art is darling! I framed it in an Ikea frame and used a gold sharpie
to make some polka dots around the mat.
The flowers painting in the corner is one of my first attempts at oils in a long time. I had a great time
painting again and thought it would look good with the paint in their room (which is Benjamin Moore's
Love and Happiness). The ampersand and the silhouettes are also painted/cut by me. For the
ampersand, I sketched out the shape on fabric and cut it out. The key for this was to have thin material.
The 'Be Brave' banner was also cut pieces of fabric and adhered using Fabri-tac. The Degas' Dancers
print is from a thrift store and the calendar is from Rifle.

For my $5 thrift store chair I spray painted it white and used a gold sharpie to make the crest and vines. I
loved the chair when I saw it because I could see some kind of art or monogram going in the middle of it.
On the other side of the room, I had my two girls paint some watercolor art and I put them behind a
white mat. I can easily change out their art here if I want. They had a fun time making art for their room.
The map is from artist Judy Kaufmann. Love her work too!
After Christmas I spent a long time weeding through clothes and toys that were not used anymore. It felt
good to organize and simplify their toys. Putting their toys in plastic, labeled bins has been a HUGE
improvement from the catch-all baskets I had in here before. The girls now put their toys away and in
the right spot! Hallelujah!
These lamp bases are from Ikea and I used some Rub N'buff on them to give them a gold/brassy look.
I'll show you the rest of the room soon. We recently put their beds into bunk beds which makes
this room feel larger. The girls have a great area to play in now.
Heatherlee is kind enough to give one of you lucky ducks an art print. You get to pick which one 
you like/love. Her art will get you excited for Spring with so many floral prints and if you have a
 little child in your life it makes charming art for kid's rooms. 
Blog Give Away

To enter the Giveaway: First go to Heatherlee's Etsy store, Laddy Poppins to find your favorite print. Then, comment below and tell me what would be your favorite Lady Poppins print. One comment per entry. One winner will be chosen at random and will receive an art print. Make sure your comment is not a "non-reply" or else I won't be able to get in touch with you. 

For additional entries:
2. Follow me on Google Connect or Bloglovin
3. Follow me on Instagram
4. Like me and follow me on Facebook.
5. Subscribe to Heatherlee's mailing list
6. Like Heatherlee on Facebook.

The Give Away will close Friday, March 13th.

********** The Give Away is now closed. *****************

Linking this to: The Best of the Nest Link Party

2.03.2015

Art for Children's Rooms

Etsy Art Children's rooms

1. Map        2. Clouds art, Emily Jeffords        3. Similar one Here
4. Whales chart       5. Stand Tall      6. Ampersand screen print 

Lately, I've been organizing our twin's room and realized I don't have much art work in there. It's a room I've put on the back burner for awhile. Do you have rooms like that in your house too? I found some darling art work on Etsy, where I love to shop. Also, I thought I would show some other great ideas for the DIYer who doesn't mind making some art, or displaying their children's art. 

Children's paintings framed as art / by Sawyer Berson
Simply frame your children's paintings. Give them a brush and some paper and you'll have your very own abstract originals. 

Timothy's Nursery Design
You could easily create your own pen-net like this IMAGINE one. 

FRESHEN UP LACKLUSTRE LINEN
Frame some lovely fabric. 

Last year, I made this silhouette print for one of our daughter's rooms. They're actually very easy to make. 

Great idea to make heart art out of Instagram pics.
Bright Bold & Beautiful
I love collage art, especially displaying family faces.

&
Pintrest
Why have I not cut out my own ampersand with some colorful fabric?

There are so many great ideas for printing out free art, making your own art or displaying your children's art. What have you done in your children's rooms for art on the walls? I hope to show you some progress soon of the twins room, at present, it's a bit on the scary side. 

11.06.2014

ORC Laundry Room Reveal

Thanks for stopping by today to see my laundry room reveal for the Linda's ORC. For six weeks I've planned and worked on our laundry room with my husband to make a fresh start. Our room was great because it was a blank slate of possibilities. You can catch up on the progress of the room here:

                      week 1       /       week 2      /       week 3       /       week 4     /       week 5

                                         Let's review what the room looked like before we got started:
AFTER:
                 This room is definitely an improvement from where it started. I love how it turned out! 
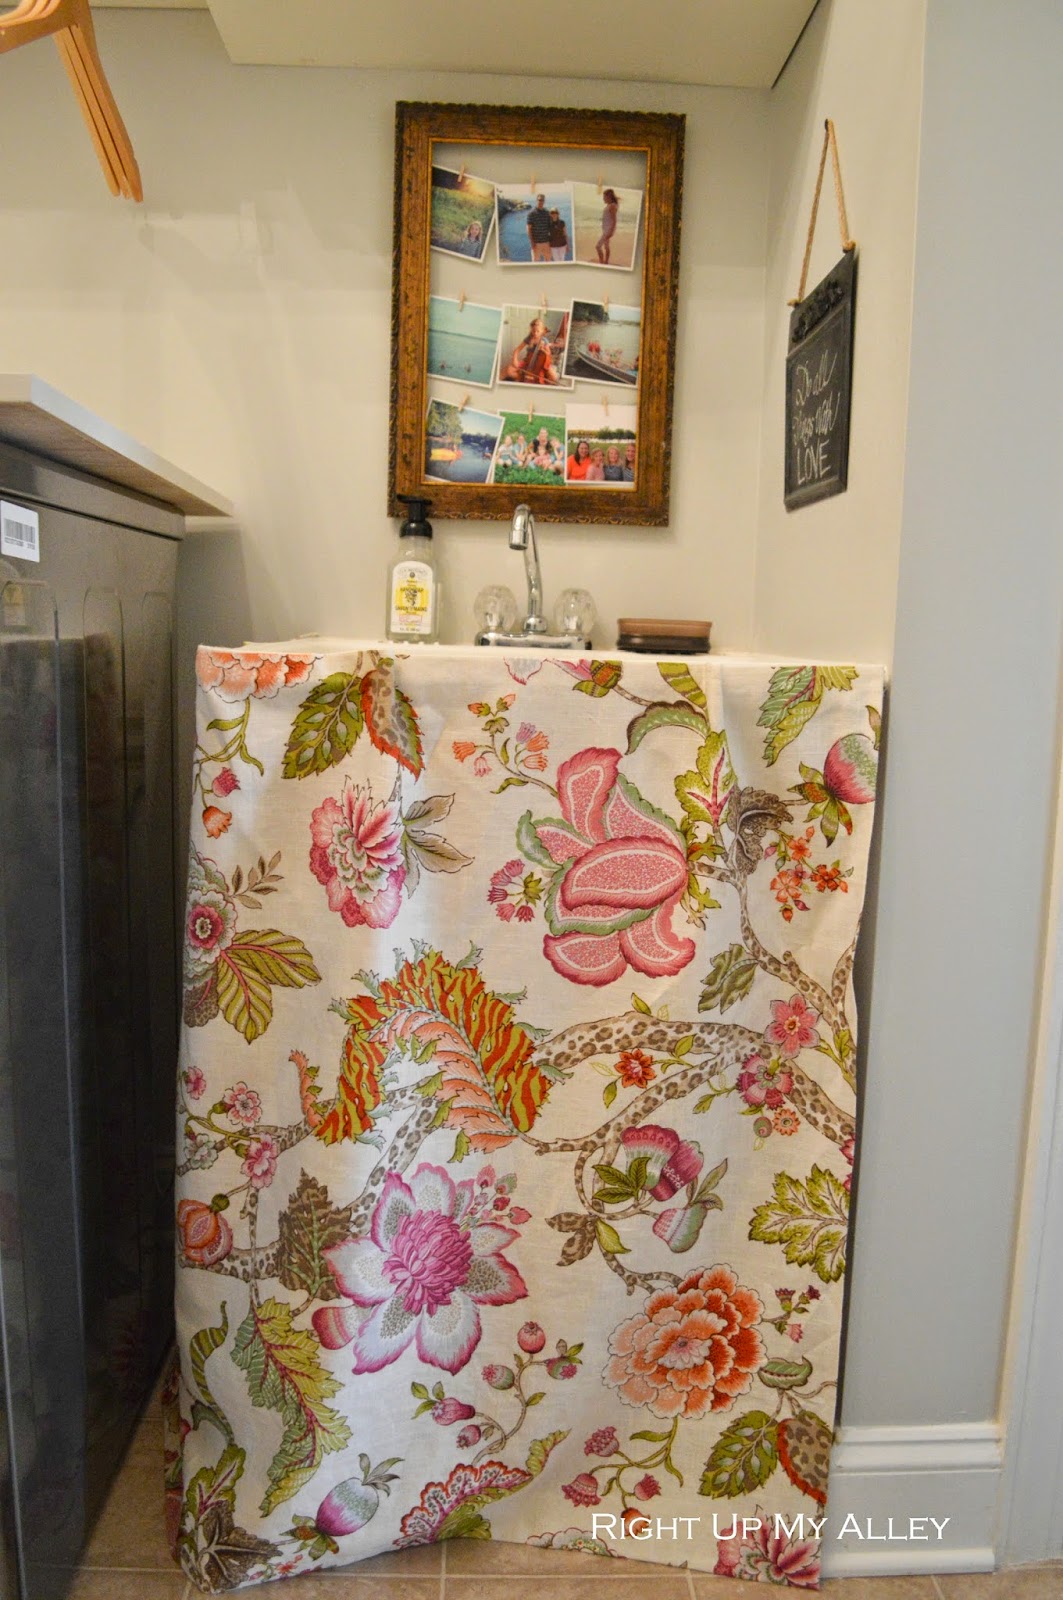
I made this sink skirt to pretty up the not-so pretty pipes under the washtub. I added some instagram prints of my loved ones above to remind me why I do laundry in the first place. 
We added a ship lap wall with hooks on the other side of the washer and dryer to give some variety to the room. The laundry room is an extension of our small hallway "mudroom" so the hooks will be used for hanging lots of things. Did I mention we have four girls? I can just see all their snow gear now lined up on those pretty hooks. Above the hooks I added some art hanging from pants hangers. The quotes I made and printed off myself. 
My husband made the cabinets, the two shelves and the folding table on top of the washer and dryer. This will definitely help with storage! I found two vintage botanical prints at an antique barn sale and put them on the shelves. I love how they match the three green containers. 
Now onto the chandy!
We used a chandelier we already had from our house. I spray painted it and added beads. I'm going to feel extra fancy in my laundry room now that I have a chandy! I'll give you the tutorial of that soon. 
New cover for the ironing board spruces things up. Above, I framed a beautiful baby sweater all my girls have worn. I really enjoy meaningful art. 
There you have it! A happy, more organized and colorful laundry room. Everything in this room was done on a budget and I'll show you the total cost and different projects next week. Thank you Linda for extending the One Room Challenge. There are so many others who were involved in the challenge too, please go see what they did HERE. They will not disappoint! 

You can check out my last ORC project HERE where I did a make-over for our pre-teen daughter's room.


Thanks to my readers who have been so kind to support me! I'll be putting up tutorials of all our DIY projects this coming week. Now, I'm off to do laundry (for real)!

SOURCES:
Coral art, baskets, green containers, hooks ... IKEA
Stripe rug... Overstock
Ironing board cover, baskets ... Target
Instagram pictures... Printsagram
fabric (P/Kaufmann)... Hobby Lobby

4.25.2014

DIY Fern Art and the $5 Chair


For the CWTS contest the first project I did was a knock off design of the Society Social Melrose Console. You can catch my tutorial here.

 I also knew I would need to stage a photo for this pretty little thing. In came my love for botanical art and my $5 chair that I decided to glam up for a photo. Here's how I made them:  
 Last summer I collected some ferns on our family camping trip and pressed it down in a book for months (I forgot about them). To press plants or flowers use parchment paper between the pages so nothing sticks together. Once they are pressed for about two weeks then they are preserved. I then Mod Podged it down on a white poster board and stuck it in an IKEA frame that I spray painted a dark gray. 
 Once I did this project,  I knew I would have free and unique artwork. Can't beat that!
These are projects I did while I literally waited for the paint to dry on the console table. I used an oil based paint on the wood, which is so beautiful but it takes about eight hours before its not tacky anymore. I was getting a little nervous that I wouldn't finish the project in time.You'll notice in the picture, I used a space heater in our unfinished basement to help it dry faster.
Enter the $5 chair I got at a barn sale. I roughed it up with a bit of sandpaper and Steve strengthened the chair since it was a wobbly one.
After I spray primed it I used Annie Sloan Chalk Paint in Graphite, watered down with a dry brush and lightly brushed it on. Dry brushing really means to keep your brush as dry as possible while painting. If I felt like I did get too much paint on I wiped some off with a paper towel. I really enjoyed this technique since it gives it almost a metallic look. It didn't take long for it to dry then I used a little Rub N'Buff on the sides to give it an antique look. I think it pairs nicely with the console table. The small pillow is from Target, Threshold. I covered the seat of the chair with a remnant of velvet fabric I had on hand.
The art and chair add some interest to the photo and now I'm enjoying a new piece of art and chair in our home. It doesn't take a lot of money to create something you will love. Hope you all have a lovely weekend.

I'm linking this post to the Best of the Nest link party.


Stay Connected

                                               Facebook    /     Instagram     /    Bloglovin