Showing posts with label paint. Show all posts

11.06.2014

ORC Laundry Room Reveal

Thanks for stopping by today to see my laundry room reveal for the Linda's ORC. For six weeks I've planned and worked on our laundry room with my husband to make a fresh start. Our room was great because it was a blank slate of possibilities. You can catch up on the progress of the room here:

                      week 1       /       week 2      /       week 3       /       week 4     /       week 5

                                         Let's review what the room looked like before we got started:
AFTER:
                 This room is definitely an improvement from where it started. I love how it turned out! 
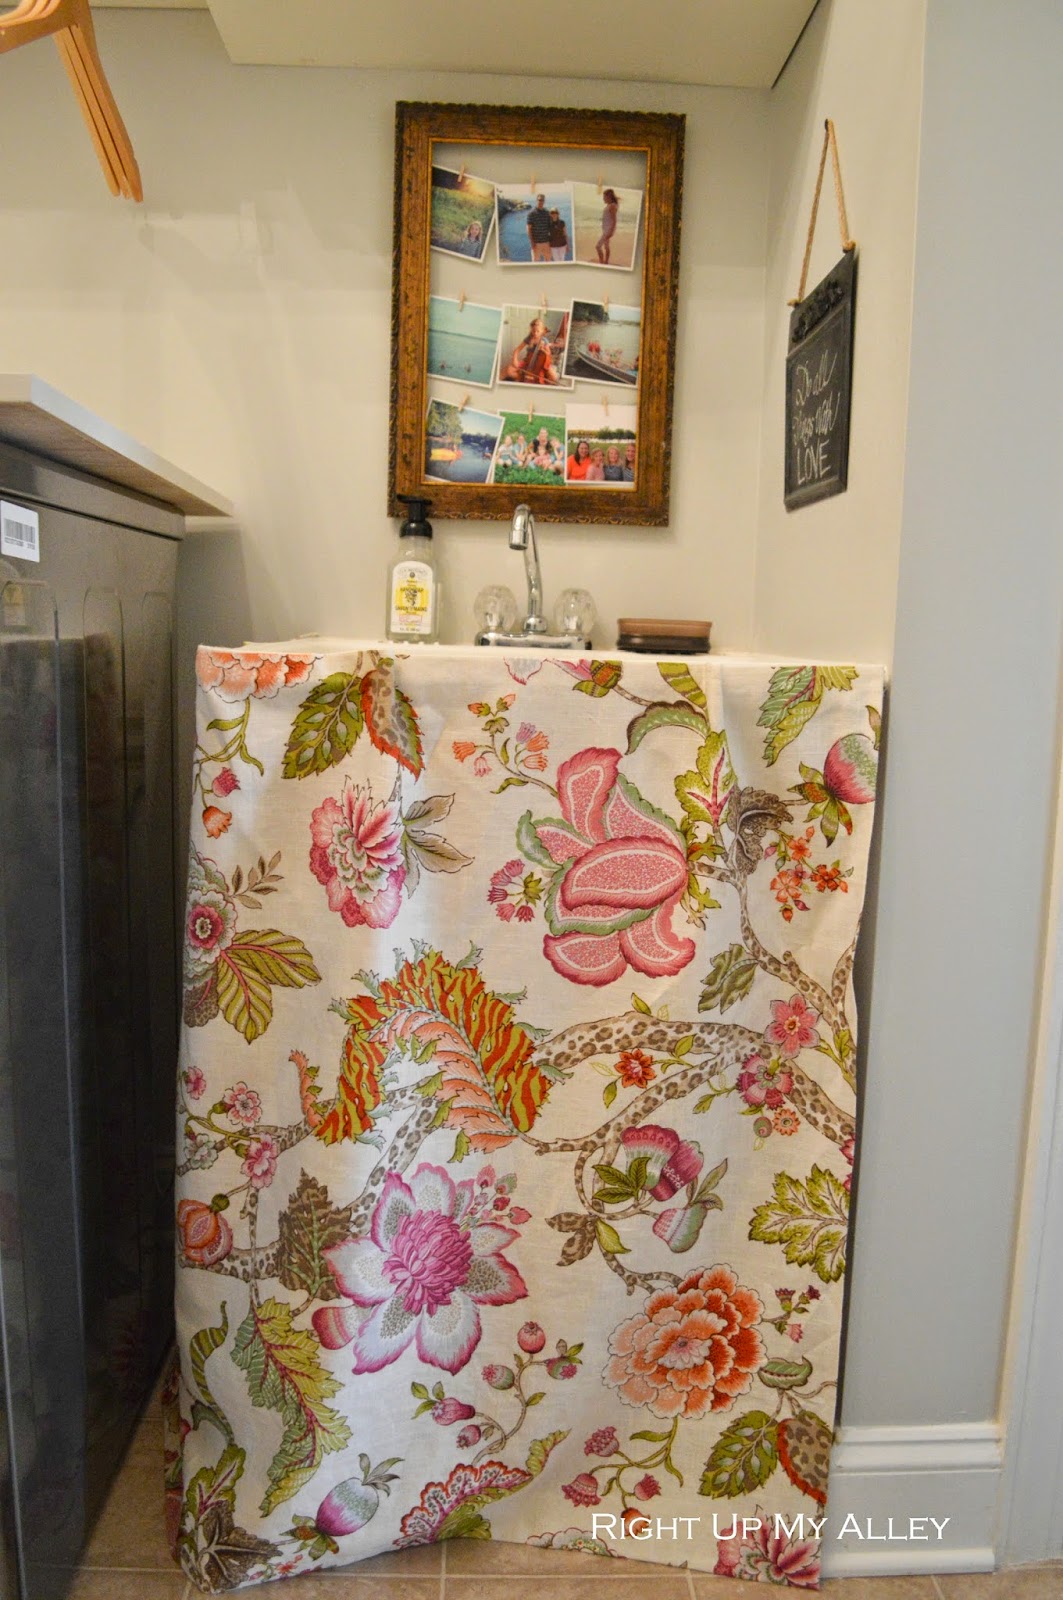
I made this sink skirt to pretty up the not-so pretty pipes under the washtub. I added some instagram prints of my loved ones above to remind me why I do laundry in the first place. 
We added a ship lap wall with hooks on the other side of the washer and dryer to give some variety to the room. The laundry room is an extension of our small hallway "mudroom" so the hooks will be used for hanging lots of things. Did I mention we have four girls? I can just see all their snow gear now lined up on those pretty hooks. Above the hooks I added some art hanging from pants hangers. The quotes I made and printed off myself. 
My husband made the cabinets, the two shelves and the folding table on top of the washer and dryer. This will definitely help with storage! I found two vintage botanical prints at an antique barn sale and put them on the shelves. I love how they match the three green containers. 
Now onto the chandy!
We used a chandelier we already had from our house. I spray painted it and added beads. I'm going to feel extra fancy in my laundry room now that I have a chandy! I'll give you the tutorial of that soon. 
New cover for the ironing board spruces things up. Above, I framed a beautiful baby sweater all my girls have worn. I really enjoy meaningful art. 
There you have it! A happy, more organized and colorful laundry room. Everything in this room was done on a budget and I'll show you the total cost and different projects next week. Thank you Linda for extending the One Room Challenge. There are so many others who were involved in the challenge too, please go see what they did HERE. They will not disappoint! 

You can check out my last ORC project HERE where I did a make-over for our pre-teen daughter's room.


Thanks to my readers who have been so kind to support me! I'll be putting up tutorials of all our DIY projects this coming week. Now, I'm off to do laundry (for real)!

SOURCES:
Coral art, baskets, green containers, hooks ... IKEA
Stripe rug... Overstock
Ironing board cover, baskets ... Target
Instagram pictures... Printsagram
fabric (P/Kaufmann)... Hobby Lobby

4.02.2014

We Made It To Round 3 of CWTS


THANK YOU to all of you who voted for our Color Block Hutch! I am thrilled to be the top three of the Creating With The Stars Contest and to advance to the next round  I love how this beat up thrift store table went from blah to sleek with some paint, new hardware, oh, and a hutch to top it off. I definitely stepped out of my painting "comfort zone" for this project but I absolutely love the way it turned out. I used four different blues in the cubbies to create a unique look. I love how the blues play together to create a fun color-block look. 


I'll be giving a full tutorial on East Coast Creative's blog on Saturday. Many thanks to my blogging mentor, Kate, from Centsational Girl who is amazing to work with and is ultra creative. Also, my dear husband Steve, gets some major brownies points as he helped me design and build the hutch and stayed up into the wee hours painting with me! 

What I love about this contest is that I'm getting some major projects done because there's a deadline. I had a friend tell me she should just tell her husband they made it into a contest so that they have to get things done too. I laughed so hard! I can't wait to show you my  UPCYCLE project that I'm working on for this week. The contest is down to six people so all the projects will be up for another round of voting on Monday. 

What do you think: would you try a color block style shelf in your home? 

3.31.2014

CWTS Voting Week 2 and Mount Vernon

CWTS logo A
                       week2 cropped
I turned in my second project for the East Coast Creative Contest. You can go HERE to vote for your favorite PAINT project. The voting is open Monday and Tuesday and you only have one vote (that's the tricky part because its hard to choose). I'm so pleased with the way the my paint design came out. I'll let you know which one is mine on Wednesday.


Speaking of paint, I was completely inspired by a historical home I visited last week. I went to George and Martha Washington's home, Mount Vernon, on a field trip with my daughter's class. Mount Vernon is one of my favorite historical homes and I couldn't pass up a field trip there! The day we went it was drizzly with rain and chilly (note: go to Mount Vernon when it's a warm sunny day, you'll be much happier).

I absolutely love touring historical homes. There is much to learn about design and architecture. Even celebrities today are influenced in design by historical homes like Rob Lowe and his wife designed their California home to look similar to Mount Vernon.
Rob Lowe
                                                                       Architectural Digest
I wasn't allowed to take pictures inside because it is a preserved home. However, I gathered some examples of some of the bold painted rooms to show you just how timeless these styles still are today. In the 18th century, it was a sign of wealth when you used bold colors in your home. Thank goodness paint is more affordable in our day.

Talk about a 'wow' effect with varying shades of turquoise and green in the grand dining room. The Washington's hosted many people in their home and I imagine they used their dining rooms often. Washington said about his home, that it was a "well resorted tavern."

The parlor has some of the best examples of colonial Virginia architecture (the columns lining the door and the fireplace mantel) and was painted in a "fashionable Prussian blue."

The smaller dining space is a bright green with gold frames. The picture doesn't show underneath the table is a black and white checkerboard inset.

The library might not be considered bold, but it is warm with the honey colored wood and a black door, which looks classic.

                                         (All interior photos via)
Aren't these rooms gorgeous? I know I'm inspired to be more bold with my paint. How about you? Have you gone bold in a room in your home?

12.12.2013

How to Wallpaper with Wrapping Paper

When I decided to make our closet into an organized craft space I wanted to try something unique in this area. Wallpaper is expensive, so I went the wrapping paper route instead (which is a lot more affordable). The wrapping paper I used is from Rifle Paper Co., which has heavy, quality papers, and I pretty much love everything on their site. Try only to use heavy wrapping paper if you are going to wallpaper with it, or it might not work well and tear with thin paper. I measured my space and got three rolls- which was the perfect amount. The paint color I used for the sides and the door is Shermin Williams, Mint Condition
 SUPPLIES:
-sheet rock knife or exacto knife
-ruler
-small towel
-sponge brush
-board for cutting
-wrapping paper
-wallpaper paste (got it here, since it's hard to find in hardware stores)
We took out the wire shelf that was in here and filled the holes. Then, my husband worked on making two shelves and a small desk to fit in this space and he put up the boards to hold everything.  I primed and painted ahead of time before we put up the wrapping paper.
First, we cut what we needed and did a "dry fit" to make sure everything would work well. Next, we used our foam brush to liberally apply a coat of paste on the back of the wrapping paper. Note- we found it worked even better if we applied the adhesive right onto the wall and then stuck the paper to it.
There will be bubbles and wrinkles! In order to tame the bubbles, we used a cloth to help wipe it in an upward motion. We discovered our ruler was a great way to press down to get the bubbles and wrinkles out after we had used the cloth.
Let it dry for several hours. I didn't get an after picture with it all done, but this is close.
After the wrapping paper was put up and dried I was already on my way to organizing all the crafts. The paper on the wall is a fun pattern and it really livened up the space. Have any of you ever wallpapered with wrapping paper? It didn't take too long and is a great idea for a small space.

11.06.2013

Progress in our Twin's Room

Since we moved into our house this past winter we have been trying to get paint on the walls, curtains and art up. Our five year old twins share this room. I don't have any good before pictures so just imagine this space with the walls in builder's flat creamy white paint (which gets dirty fast). So far we've painted their room in Benjamin Moore's Love and Happiness. It's a great shade of pink since it's so light and creamy- just what I was looking for. There are many other things I want to do with their space, but I know projects and rooms sometimes take time to get it the way you want. Note: These are progress images:
One of my favorite pieces in their room is the blue french-y dresser. I wish I could say I painted it, however, this beauty was my first piece I ever bought at Lucketts Store. The shape and color are what got me. After I bought this dresser it helped me think about how I could paint some of our furniture that needed updating. Really, it was an inspirational piece for me!
The world map is a great etsy find by Judy Kaufmann. I really like the idea of maps in children's bedrooms so they might learn a bit of geography when they have some downtime. This wall will be fun to work on! Since we have identical twins, I think this picture (below) would be perfect in their room too.
Twins & Identical Twins Print - 8x10 or A4
                                                         Judy Kaufmann

                                               And this one (they love bugs).
Bug Print - Ladybug
                                                         Rifle Paper Co.


Some of the art we have put up are Jessie Willcox prints. Have you seen her art before? She was an American painter who captured tender moments of childhood. Sometimes my girls will look at these prints and say things like, "I'm like the girl reading her book in the window." Here are some other darling images.


These two are such hams! They helped me make the watercolor banner for their fifth birthday. Their room needed a bit more color so up goes the banner for the time being. We got the idea here.
                                               More updates with this room down the road.

10.09.2013

Thrift Store Buffet Makeover

Don't you love when you find a great deal? There is no better place than thrift store shopping to find one; diamonds in the rough. I found a small buffet at a Good Will for $12 and was thrilled. Some people might think-' yum, no. I'm not buying that.' But, think of all the potential!

Here's the before shot:

Here's how I transformed the buffet table:
1. Lightly sand all surfaces.
2. Wipe it down. If the piece is especially smelly our musty smelling- bring it outside on a nice day and air it out. Then, douse a cloth with a vinegar and water mix and wipe it all down. I found vinegar to be a great way to help get rid of odors and clean surfaces.
3. Take off the hardware. You can also replace the knobs really easily if you need to. I spray painted the knobs gold and reused them. I spray painted them with this Krylon gold plate spray:

I wasn't sure if I could get those basket weave door-fronts off, but with a bit of prying they popped right out.


4. Prime it. For this table I used Zinzer oil based primer. This is the stinky stuff, but I found it's a great primer for adhering to laminate. Sometimes I use spray-paint primer - especially if it's difficult to get into the crevices and hard-to-reach nooks and crannies.
5. Paint. I chose Valspar's Peacock Blue in a Satin finish. I added a few tablespoons of Floetrol to the paint. Floetrol helps your painting go on smoother so you don't see brushstrokes (its essentially a thinning agent). This is especially important when using a true gloss finish. I did two coats of the paint. The Floetrol comes in this orange container (you can see it in this picture to the right).
6. Almost done... Once it's all dried you should protect your new beauty with either wax or Polyurathane. I did one coat of Poly in Satin for the table. Once its on and dried the Poly helps protect against scratches and the occasional 4-year-old.
Yes- sometimes I paint while my children watch a movie. (This is a picture of our old home in the basement.)

The lamps were also a thrift store find as well for $10 each. I spray painted them a cheery yellow. More about spray painting coming soon. Have you ever bought a piece of furniture with potential? I would love to hear what you did with it!


10.07.2013

Board and Batten it!


Welcome to our dining room! Step right this way. Putting board and baton in our dining room was our first project when we moved into our home. The dining room is the first room you see when you walk into our home, so I really wanted it to look fresh and serene. I love how Board and Batten looks in a room. I grew up in New England with lots of Cape homes and cottage style homes. Batten reminds me of theses styles. Board and Batten is also an inexpensive way to add some depth to a space without much money. The whole project cost us about $80. The paint above the white is Shermin Williams, Sea Salt.

For this project, we installed chair rail and battens to the plain sheetrock walls. In other words, we didn't install any "board" in this board and batten project.

Here is a TUTORIAL:

1. Decide you want the Board and Batten look. Hahaha! Of course you do!
2. Install chair rail. Normal chair rail height is between 32 and 36". For this project, we raised the chair rail up to 5'. The height we chose was based not on an exact dimension, rather what fit between switches and the thermostat. In other words, we eyeballed it.


3. We used 1/4" thick veneered plywood from Home Depot and cut them into 3 1/2'' wide battens using a table saw. We wanted battens to be thinner than our baseboard so the battens wouldn't stick out and 1/4" worked well. Also, you have flexibility on width; You may want wider or thinner battens depending on how large your space is and how tall your chair rail is.
4. Then we cut the battens to length from the top of the baseboard to the bottom of the chair rail.
5. The spacing between battens was based on proportions of our space but also considered the locations of outlets (which we didn't want to cover or cut around) and windows (we didn't want to cut battens to fit around window casings or sills). Again, there is a lot of flexibility on spacing. To find out spacing, we first found the center of our most complex wall (which had two windows and two outlets). That is where the center of the first batten went. We started with 6” between battens and taped the batons in place to see what they would look like (it covered an outlet, blurg). Then we went to 9” and it didn't work with the windows. Then we tried 8” and it was Juuuuuust right. This spacing worked out for the rest of the walls.

5. To secure the battens to the wall, we used Liquid Nails (for paneling) from Lowes. We also nailed the panels to the wall with a trim nail gun, which essentially held the battens in place while the Liquid Nails cured.
6. Fill in the nail holes (we used Dap nail filler), and caulk around the sides of each batten.

     
7. Once everything is dry, its prime time. Prime all un-coated wood. We normally use Zinzer water-based primer.
8. Then its time to paint. We painted the battens and the wall behind it with the same semi-gloss white trim paint that we used throughout the rest of our house. We did two coats of white and then stood back and admired the whole thing.
9. Once it's all done, do a victory dance (this is the most important step) and admire your new space.


Here's a close-up. My husband made the buffet table as well. 

Here are some other ideas for the board and batten look:

                                                              House Beautiful                               
I love how this image takes the boards all the way up to the ceiling. Great cottage look.

                                                                          via

                                                                        via

The other thing I love about Board and Batten is the way you can still make your room look formal or more cottage-casual. Here are some more views of our room:


I would love to hear if you have ever done board and batten and if you have any tips that worked best for you. We thought this project went quick and it really changed the look of the room. Did you find it an easy project?