Showing posts with label organization. Show all posts

1.14.2015

Turning A New Leaf

I've been blogging for a little over a year now and  love it! Your comments and encouragement have been so kind and helpful. I think what I like most about blogging is it reinforces me to stay creative. It might be a little late in the month, but I thought I would share some of the things I am going to work on this year.  

1. Love my Nixon D3200! Now, it's time to take a photography class.
2. Hang more artwork in our home! Art can really make a house a home. I have several rooms begging for something pretty/meaningful to be on them.
3. Organize the clutter in those closets. Don't call the Hoarders show on me yet! I have some major work to do. I don't know about you, but after cleaning up Christmas decorations I like things to look simpler and clean! Can't wait to show you some good before and afters and closet makeovers!
4. Make some time to read and keep learning. I think it's important to take a few minutes a day to do something enriching for your mind and spirit.

2015 is already shaping up to be a good year. What about you? Do you have some new goals on the horizon?

11.06.2014

ORC Laundry Room Reveal

Thanks for stopping by today to see my laundry room reveal for the Linda's ORC. For six weeks I've planned and worked on our laundry room with my husband to make a fresh start. Our room was great because it was a blank slate of possibilities. You can catch up on the progress of the room here:

                      week 1       /       week 2      /       week 3       /       week 4     /       week 5

                                         Let's review what the room looked like before we got started:
AFTER:
                 This room is definitely an improvement from where it started. I love how it turned out! 
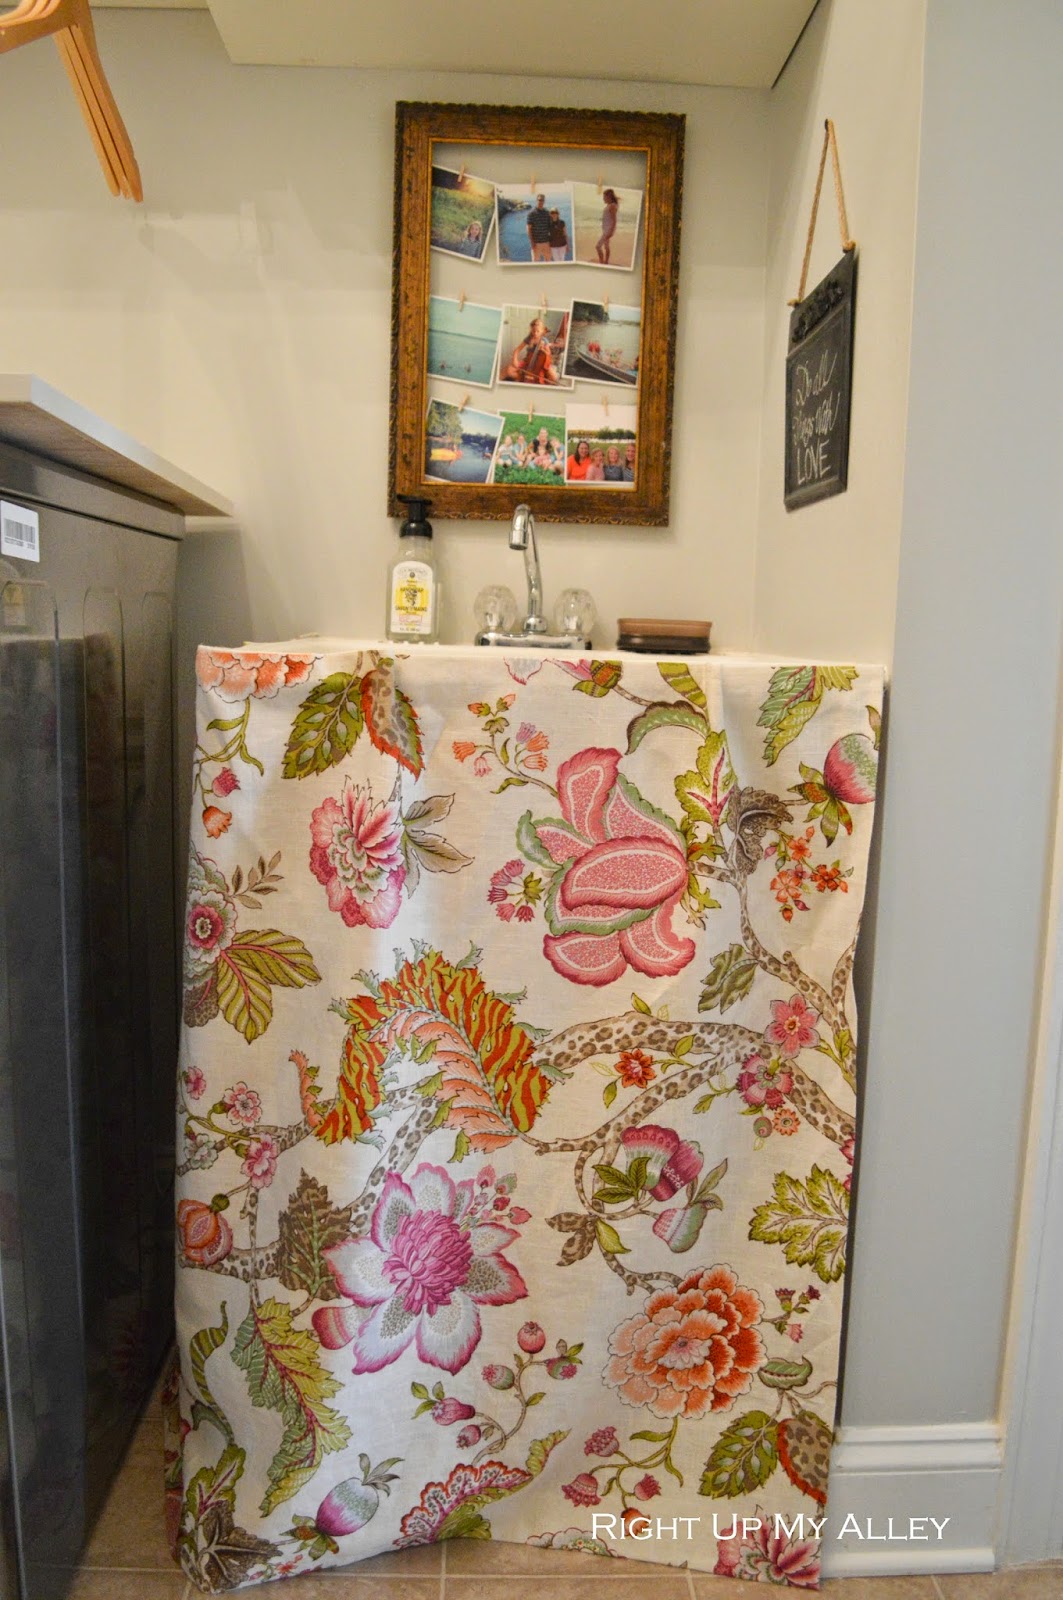
I made this sink skirt to pretty up the not-so pretty pipes under the washtub. I added some instagram prints of my loved ones above to remind me why I do laundry in the first place. 
We added a ship lap wall with hooks on the other side of the washer and dryer to give some variety to the room. The laundry room is an extension of our small hallway "mudroom" so the hooks will be used for hanging lots of things. Did I mention we have four girls? I can just see all their snow gear now lined up on those pretty hooks. Above the hooks I added some art hanging from pants hangers. The quotes I made and printed off myself. 
My husband made the cabinets, the two shelves and the folding table on top of the washer and dryer. This will definitely help with storage! I found two vintage botanical prints at an antique barn sale and put them on the shelves. I love how they match the three green containers. 
Now onto the chandy!
We used a chandelier we already had from our house. I spray painted it and added beads. I'm going to feel extra fancy in my laundry room now that I have a chandy! I'll give you the tutorial of that soon. 
New cover for the ironing board spruces things up. Above, I framed a beautiful baby sweater all my girls have worn. I really enjoy meaningful art. 
There you have it! A happy, more organized and colorful laundry room. Everything in this room was done on a budget and I'll show you the total cost and different projects next week. Thank you Linda for extending the One Room Challenge. There are so many others who were involved in the challenge too, please go see what they did HERE. They will not disappoint! 

You can check out my last ORC project HERE where I did a make-over for our pre-teen daughter's room.


Thanks to my readers who have been so kind to support me! I'll be putting up tutorials of all our DIY projects this coming week. Now, I'm off to do laundry (for real)!

SOURCES:
Coral art, baskets, green containers, hooks ... IKEA
Stripe rug... Overstock
Ironing board cover, baskets ... Target
Instagram pictures... Printsagram
fabric (P/Kaufmann)... Hobby Lobby

9.24.2014

Family Command Center

I don't know about you, but I get loads of papers that come in everyday with the mail, school papers, schedules, reminder notes, etc. It's hard to keep it all organized! I felt like the perfect place to organize all our papers was a wall between our kitchen and hall closet.
I got this used bulletin board at a thrift store for a few dollars. You can find so many of these inexpensive boards.  With a little spray paint (black), fabric and ribbon it was transformed!
Here's the wall BEFORE. I used some painter's tape to mark where I would put everything. 

Now, it's a great place to put reminders, the dog leash, inspiring quotes and cute pictures our girls draw. I used chalk paint to take a thrift store platter into a small unique chalkboard. I used a basket I already had and hung it with Command hooks. The hooks at the bottom came from TJ Maxx on clearance.
The files are from Target dollar isle (which is one of my favorite isles). 
Now, I'm ready for those papers! Do you have a command center in your home? I would love to hear how you organize your daily paper trail.


Linking this post to :

9.12.2014

Design Inspiration Friday

Happy Friday everyone! I finished my Home Depot project this week and showed a sneak peak on Instagram. Come back Monday to see it. Today, I found some inspiring ideas and projects for the home. I hope you have a great weekend!

                     A great tutorial on a bleached wood look with liming wax. I can't wait to try this out.
Family Room
This family room reveal is gorgeous and inspiring. 


                                                A great way to store children's toys via Play Chic Interiors.

Unique Kitchen Command Center
I've been looking at lots of command centers getting myself more organized this school year. I like this one.


9.08.2014

Organized Home Office

Organized Home Office

Organized Home Office by tracylaverty

hutch / pillow fabric / roman shades fabric / rug / desk / letter organizer / chair 
basket / wire basket / IKEA magazine storage / hooks

I'm working on a plywood project for Home Depot and while we were at it, we have been working on a home office makeover too. Our office has been the same builder's grade paint as the day we moved into our home (over a year and a half ago).  I'm trying to get my daily life more organized and make it a more functional classic space. It is coming together nicely and I can't wait to show you the end result. Check back soon so I can show you what we did in here.

1.10.2014

Inspiring Mudrooms

Mud & laundry.  Open lockers, wash station, grasscloth, slate flooring
                                                                             via
Hi friends! Since we have quite a few children we are accumulating lots of gear and it's spilling out in our mudroom area. We have already built a bench with four cubbies in our hall closet, but my husband and I agree that we could do a bit more to organize the space. Here are a few inspiring images that might help me and you. January is a great time to start organizing and de-cluttering!
Mudroom
/
We're really looking into building a whole system like this one.
closet converted into mudroom | make a closet more functional by removing doors, adding a bench at kid height, hooks for jackets and baskets for shoes, sunscreen and hats
via
.
Gideon Mendelson
I love me a good nautical chart!
stripe obsessed
Don't you love those stripes?
Mr. Antonson's orphaned glove collection
I'm thinking lost mittens are a fun idea to frame in a mudroom. 
Mudroom
Better Homes and Garden
This weekend is going to be the start of planning out our mudroom closet so I'll be posting pictures soon. Have a lovely weekend!

12.13.2013

Peg Boards and Organizing

The peg board is a great invention! I love that I can see where my scissors, tape and ribbons are in our new craft closet. 
                                 My husband framed the back of the peg board using liquid nails.
We hung it using toggle bolts. Let's just say- this was not an easy task putting up a peg board on a hollow core door.
The baskets are IKEA and I banded it with some washi tape to give it a punch of color. The clear bins and glass jug came from Target. I used mainly bins we already owned. The labels are from the Martha Stewart line at Staples (love them).
 The hanging file used to be a brown cardboard, but I spray painted it to look like metal. I hung it using 3M velchro strips, and it worked great. I'm glad it went on the wall to give me more room at the desk area. The frame to my quote is from a thrift store which I spray painted white. I staple gunned some burlap onto the back of the frame and taped my quote up. Taping the quote means it will be easy to change it out for other inspiring messages.
The hanging scissors are also thrift store and I stained it. The metal caddy holds things like stamps, washi tape, brushes, glues, etc. 
Overall, it's really nice to have a home for my sewing machine and a place to put extra fabric, papers, and supplies. We did install an outlet in the closet too, so I can do quick sewing projects. Organizing my crafts meant throwing out some things that were not being used or old. It's always good to purge a bit so you can get the look you want. Next, I want to make a little chandelier for this space. Add it to the project list! 


12.12.2013

How to Wallpaper with Wrapping Paper

When I decided to make our closet into an organized craft space I wanted to try something unique in this area. Wallpaper is expensive, so I went the wrapping paper route instead (which is a lot more affordable). The wrapping paper I used is from Rifle Paper Co., which has heavy, quality papers, and I pretty much love everything on their site. Try only to use heavy wrapping paper if you are going to wallpaper with it, or it might not work well and tear with thin paper. I measured my space and got three rolls- which was the perfect amount. The paint color I used for the sides and the door is Shermin Williams, Mint Condition. 
 SUPPLIES:
-sheet rock knife or exacto knife
-ruler
-small towel
-sponge brush
-board for cutting
-wrapping paper
-wallpaper paste (got it here, since it's hard to find in hardware stores)
We took out the wire shelf that was in here and filled the holes. Then, my husband worked on making two shelves and a small desk to fit in this space and he put up the boards to hold everything.  I primed and painted ahead of time before we put up the wrapping paper.
First, we cut what we needed and did a "dry fit" to make sure everything would work well. Next, we used our foam brush to liberally apply a coat of paste on the back of the wrapping paper. Note- we found it worked even better if we applied the adhesive right onto the wall and then stuck the paper to it.
There will be bubbles and wrinkles! In order to tame the bubbles, we used a cloth to help wipe it in an upward motion. We discovered our ruler was a great way to press down to get the bubbles and wrinkles out after we had used the cloth.
Let it dry for several hours. I didn't get an after picture with it all done, but this is close.
After the wrapping paper was put up and dried I was already on my way to organizing all the crafts. The paper on the wall is a fun pattern and it really livened up the space. Have any of you ever wallpapered with wrapping paper? It didn't take too long and is a great idea for a small space.

12.11.2013

Craft Closet Reveal


This is a story about a tiny unorganized closet that turned into a useful home for crafts. At first, it was an eyesore, but then it magically turned one day into something happy and pretty.
On the outside it looks like any other closet, but now when you open the door, you get....
SURPRISE- an organized crafty place! 
Oh the peg board! Be still my heart! 
Well, you don't want to forget this message when you are in a state of creativity. 
I adore how this space turned out. Every time I open the door I'm thrilled with the mint and light pinks that greet me. I'm also loving having my craft things in one place and where I can see them. It makes it easier to find things. I will have all the details for you of how I put it together tomorrow.